Yes. I've previously stated I would be posting my entry for the recurrent painting contest. I know. But... at the end, it was such a FAIL, that I decided to wait until I can get some better pics. My pictures were such crap, that my mate Lemon (the owner of the dwarf I converted/painted) tried to make better ones. They were better than mine, but not as good as other pics from the 13 other entries! I scored 0 votes, LOL! Anyways, this month were better entries than last one, and at least the one who won din't by default.
So... after this explanation, will I show you some kind of tutorial about mould making and resin casting.
In this part, I'll show how to make a "hemi-mould", or the half of a mould.
I think that the pics speak for themselves, but I'll add some words anyways.
Let's begin.
First, what do you need:
- LEGO pieces
- Silicone and activator
- Resin and activator
- Vaselin
- Plasticine
- A stick or something to add the vaseline
- Big syringe and little one too
- Plastic container, glass or something where to mix the silicone and activator
Begin making a place with the LEGO cubes for the piece or bit you want to replicate.
Then, add plasticine in to the "box". I use Play-Doh because it's cheap, you can let it dry and remove it easily. If you want, you can try other alcohol-soluble plasticines.
Put your mini/bit in there. Be careful to follow the original moulding lines. And try to clean them before. Get it?
The, cover the plasticine with some kind of lubricant. Vaseline works fine. Melted vaseline works better. Liquid Vaseline works even better. And if you can get some professional desmoldant, it's even better.
With a syringe (the big one) substract the amount of silicone you need and add it to yor container.
Let the silicone resting for about five minutes, to let the bubbles go out. If you can acces to a gypsum vibrator machine or something that vibrates (no, those things didn't work this time xD) you can get rid of the bubbles easier. If you don't, just wait a little.
Then, with the little syringe substract the amount you need of activator. Mix vigorously.
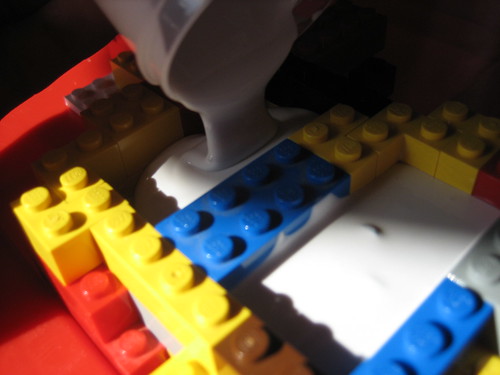
Pour your mix into the LEGO boxes. Before, you should add some LEGO cubes to the border of the boxes, in order to contain the mix and cover completely the bit or miniature.
That's it! Then you should wait 24 hours to let the silicone cure.
In this tutorial, I've avoided topics such as the silicone mixing and other hints and tips. This is only the first part, so, consider it "mould making 101"!
I'm also working now in another comission work. Once again, Dwarfs!
This time my job is to paint 25 Dwarf Clan Warriors with HW and shield for another friend.
Hopefully I'll be posting some WIP pics of those, now I'm finally "almost" done with their paintjob. Actually... I'm not, but that's what I said Topo about his dwarfs. I still must some things, and the magnetize their bases!
See ya soon.


No comments:
Post a Comment